Understanding Cycling Power Zones
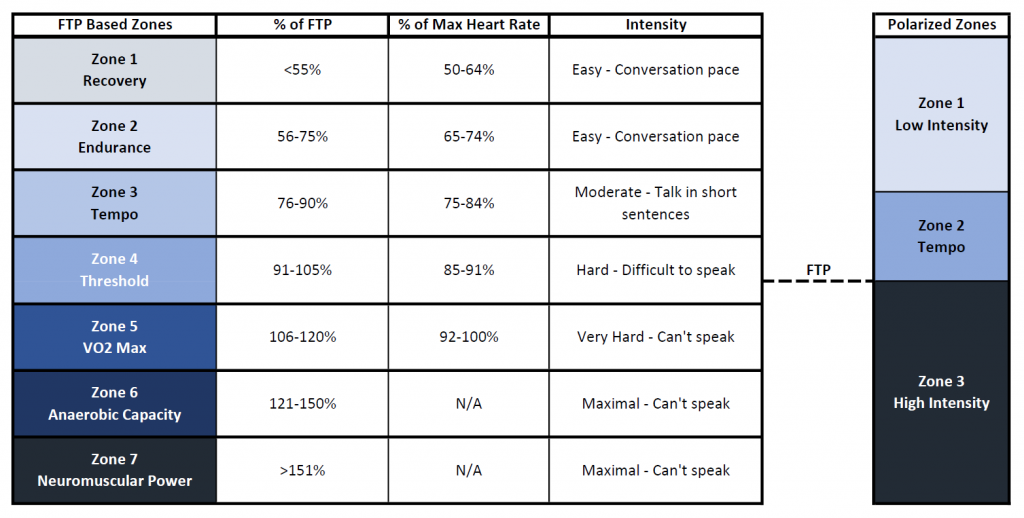
Training according to power and/or heart rate is a great way to get specific with training to maximise improvements. Following is a table which gives a comparison between intensity, heart rate, and power zones. With the use of a power meter, it is possible to target specific training zones to generate certain training outcomes as discussed in this blog.
7 Cycling Power Zones
These zones are the standard cycling zones generated by Dr. Andrew Coggan (Co-author of the book Training and Racing with a Power Meter).
Zone 1 Active recovery <55% of FTP
This zone is to encourage recovery without adding additional stress to the body. It is not about gaining fitness and should be kept relatively short in duration.
Zone 2 Endurance 56–75% of FTP
Key for building endurance to allow you to go long. This zone is useful for building a solid base in which to add intensity to. Endurance zone helps to build long lasting fitness, it takes time but also is not so quickly lost.
Zone 3 Tempo 76–90% of FTP
This zone is sometimes referred to as a ‘no-go zone’. It is hard enough to tire you out, but not hard enough to make the gains for good progress. However, for endurance events, this zone can be highly useful doing long intervals at (IE Ironman), as these are very event-specific workouts. Getting used to race pace intensity is a very useful skill.
Zone 4 Threshold 91–105% of FTP
This zone is where the difficult noticeably increases. Working on this zone can see big improvements to FTP.
Zone 5 VO2 Max 106–120% of FTP
This power zone targets your V02 max system. Efforts in this zone can vary from a couple to several minutes and are intense. For an amateur triathlete, this is the upper range of what is commonly recommended to train.
Zone 6 Anaerobic capacity 121+% of FTP
Training in this zone is very challenging and requires plenty of rest between efforts. Intervals range between 30 seconds and 2 minutes. Useful for launching attacks in a cycle race, or draft legal triathlon race.
Zone 7 Neuromuscular power FTP N/A
This zone is about microbursts, very short all out efforts up to 30 secs. Pedal as hard as you can, and you’ll be in zone 7! This is where the power for a sprint finish is be developed.
Polarized Training Zones
Dr. Stephen Seiler published the polarized training method, which involved spending most of your training easy so that the hard days can be quality.
Zone 1 Easy below aerobic threshold
This zone focused on building endurance through easy aerobic efforts. Think about keeping things conversation pace, and you are in the right ballpark.
Zone 2 Tempo
This is the ‘no-go zone’ in the polarized training method. This is tempo training.
Zone 3 High Intensity
This zone is at FTP or higher. Time spent training here should be hard, as this is the point of this training model allowing you to maximise the quality of the hard training days.
Training Zones Effect
Think of your FTP as the top of a table, and the higher the table is the higher your FTP is. When you use the lower intensity training zones, this can be thought of as pushing the table up from below. Whereas, training at a higher intensity is like pulling the table up from above. It is harder to pull your FTP up, rather than push it up. Gains from low-intensity training are slower than high, however, the improvements from high-intensity training are not sustainable long term.
Sweet Spot Training
Did you notice that in both of the above models that sweet spot training (SST) sits in the ‘no-go zone’? However, SST routinely recommended, as it provides great training benefits for the time spent training. SST is usually between 83% and 97% FTP, falling into Z3/Z4 in the 7 band model, or Z2 in the polarized model. Training SST can lead to creating too much fatigue for an athlete allow them to push on the harder sessions. But, this all depends on the athlete, as we are all individuals! Some athletes will respond very well from this training while being able to recover and make the most of hard sessions too.
As someone becomes more highly trained, the polarized training method seems the method of choice. I believe this is because of the volume of training, there is not enough time to recover for a quality hard session, for the fatigue created from training in the ‘no-go zone’. Although, this training model still applies when you reduce the volume, when time limited, training which elicits good gains for time spent becomes valuable. This is where I see SST has a great benefit. It also provides very race-specific efforts for longer course triathlon. I enjoy doing SST as part of my build, as I only do a little high intensity. My focus is on creating a solid foundation, and SST adds some intensity into the weekly routine.
Routine - Mix It Up
Finding a routine that suits you is important to building consistency. By doing the same training sessions consistently you benefit from being about to track progress and see improvements. However, to maximise gains you need to keep providing stimulus to the body to keep improving. The body learns and adapts to training, so if you keep doing the same sessions over a long time, the gains will plateau.
The solution is to do small training cycles with 3-4 weeks of similar sessions, before changing up some sessions to create some variety for the next training block cycle. Mixing up the training zones helps to avoid stagnating and also adds to the enjoyment.
Summary
Knowing your zones and why you are training in a particular zone can help you to really focus on getting the best out of a training session. Be adequately recovered to achieve the outcomes from training at zones above FTP. Too much high-intensity training will result in not being able to go hard when the goal is to ride hard. Remember to mix up your intensities, sprinkle in some high zones with majority easy. Variety is key to keeping motivated.
Further reading:
https://www.evoq.bike/blog/complete-polarized-training-guide
http://baronbiosys.com/sweet-spot-threshold-and-polarized-training-by-the-numbers/
https://www.bikeradar.com/advice/fitness-and-training/what-is-ftp-and-why-it-matters-for-cyclists/


You May Also Like
Ride Faster Easier
January 23, 2020
Improve Breathing for Better Performance
August 27, 2020
Cycling Prehab
December 21, 2020Newsletter
Stay in touch, including tips and training sessions to improve.
Thank you!
You have successfully joined our subscriber list.
- luke@lukejonestri.com
- Sydney, NSW, Australia
Copyright © Luke Jones

